This is a special photo tutorial for my friend Joanna who blogs at
Jo-With-It's Portfolio. Incidentally, she's also the
Organizing Mommy's daughter. This is specifically for her but anyone who wants to know how to take a strapless dress and turn it into a boatneck bodice! Get out your tracing paper, patterns, rulers and tape measures, and a generous amount of patience, because we're drafting patterns!
PS: There's a lot of prayer involved in this. Although I "get" the concepts and have significant drafting experience, this is the first time I've done this specific adaptation. If something is horribly wrong, forgive me. And if my drafting teacher ever sees this... well... I hope I do you a bit of justice! You taught me beautifully!
Joanna's working with this pattern, shown below. It's a cute princess line dress, currently all one piece from the top to the hem. It won't be for long :). I'm demonstrating using... well... not this pattern, since I don't have it. And, I can't tell you what pattern I'm using because I've drafted it and it has zero resemblance to the pattern I started from.
STEP 1: Trace your tissue pattern onto another paper. This is for a couple reasons. First, if you totally mess up, you still have your original to go back to. Second, tissue is weak and rips easily -- not going to hack it once we start playing with it. I prefer cut up brown paper bags simply because that's what I have. You're welcome to use whatever is large enough and a bit sturdy.
You only need the bodice part for what we're doing: trace off the waistline and above, plus a seam allowance. Make sure there's tons of paper above, since that's where we are adding. I drew my pieces side by side so that I can't get them twisted up.

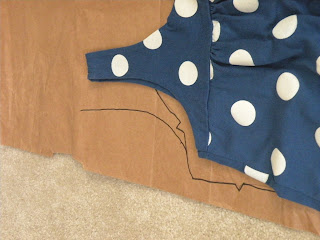
STEP 2: Measure how far up the center front comes now, and how far you would like it to come up. Draw this line. (On the picture: The straight line is a continuation of the fold. The little cross mark is where I want the new neckline to be)

STEP 3:Continue up the 2 princess lines. Try and keep the angles they're currently going at. If you've started with a well-fitting bodice, you don't want to change the lay of the fabric too much.
STEP 4: Tricky part. Decide what kind of sleeve / shoulder strap you want. I'm going to draft this to be a narrow sort of strap over the outside of the shoulder. Here's another tricky part that goes along with it: you're going to need to sketch an armhole curve. My suggestion? Find something in your closet with the curve you're looking for and use that as a model.
STEP 5: Sketch in a neckline according to what you'd like. HINT: Leave it higher than you think you'll want. You can always cut it down later. Technically, when drafting, you can always build up, too.... but it's way, way, WAY easier to cut down. I want this to scoop out just below my collar bones so I'm drawing it a little above. You'll want to go over both pieces. This is where having them side by side is useful. Remember your mark from step 2: that's where you'll start from (or a bit above: remember seam allowances!) Add a notch where the side and center front will meet.

And that's the basics of drafting a pattern! Now you repeat the same concepts on the back. I typically find that the back is easier because it doesn't have nearly as much curve as a woman's front does. If you look at some fabulous 50's dresses, they play with the back a lot: making it square, lower than the front, higher... whatever. Have some fun. Since we didn't change the waist seams or the bust curve at all, those SHOULD still fit.
Here's where the rubber hits the road. Take your newly drafted pattern and some scrap or cheap fabric. Trace the pattern onto the fabric. Then, cut it out leaving GENEROUS ADDITIONAL SEAM ALLOWANCES. Why would I have you do that?
- You trace because that's the edge of the pattern. You want to sew whatever the seam allowance is (for most Big 4 patterns it's 5/8" in from THAT line.
- You leave generous additional seam allowances because you may need to adjust the fit. Remember what I was saying about being easier to cut away then add back on? This is, for lack of better term, insurance.
Sew your bodice together using long stitches. I do all my pattern work with 4mm stitches. Tight enough to hold, loose enough to take out. And I promise you, you will be taking stitches out, at least once if not 100 times (j/k -- hopefully not that often!). Do baste in your zipper into place as well. Otherwise you won't get an accurate fit.
If you're lucky enough to have a dress form, put your bodice on the form and look at the fit. Use pins and markers to make the fit *perfect*. Feel free to draw on your fabric! Take it back to the sewing machine to tighten places if need be. Grab your seam ripper and change things where you should. Do not cut anything at this point.
This is enough to get you started. Come back tomorrow for how to get from this marked upon mess on your dress form all the way to your finished dress!

2 comments:
Thanks SO much! I'll get started soon...hopefully. I'm starting to stress out a little. ONE WEEK LEFT! Aaahhh! Yeah, I will definitely be tracing patterns every spare moment that I'm not doing geometry, memorizing bible verses, or studying for sign language, biology, and lit finals. :-) Pray for me!
Wow! That is great! Thanks for doing that. I'm going to make sure she sews tomorrow!
Post a Comment